-
0
Patient Assessment
- 0.1 Patient Demand
- 0.2 Anatomical location
-
0.3
Patient History
- 2.1 General patient history
- 2.2 Local history
-
0.4
Risk Assessment
- 3.1 Risk Assessment Overview
- 3.2 Age
- 3.3 Patient Compliance
- 3.4 Smoking
- 3.5 Drug Abuse
- 3.6 Recreational Drug and Alcohol Abuse
- 3.7 Condition of Natural Teeth
- 3.8 Parafunctions
- 3.9 Diabetes
- 3.10 Anticoagulants
- 3.11 Osteoporosis
- 3.12 Bisphosphonates
- 3.13 MRONJ
- 3.14 Steroids
- 3.15 Radiotherapy
- 3.16 Risk factors
-
1
Diagnostics
-
2
Treatment Options
-
2.1
Treatment planning
- 0.1 Non-implant based treatment options
- 0.2 Treatment planning conventional, model based, non-guided, semi-guided
- 0.3 Digital treatment planning
- 0.4 NobelClinician and digital workflow
- 0.5 Implant position considerations overview
- 0.6 Soft tissue condition and morphology
- 0.7 Site development, soft tissue management
- 0.8 Hard tissue and bone quality
- 0.9 Site development, hard tissue management
- 0.10 Time to function
- 0.11 Submerged vs non-submerged
- 0.12 Healed or fresh extraction socket
- 0.13 Screw-retained vs. cement-retained
- 0.14 Angulated Screw Channel system (ASC)
- 2.2 Treatment options esthetic zone
- 2.3 Treatment options posterior zone
- 2.4 Comprehensive treatment concepts
-
2.1
Treatment planning
-
3
Treatment Procedures
-
3.1
Treatment procedures general considerations
- 0.1 Anesthesia
- 0.2 peri-operative care
- 0.3 Flap- or flapless
- 0.4 Non-guided protocol
- 0.5 Semi-guided protocol
- 0.6 Guided protocol overview
- 0.7 Guided protocol NobelGuide
- 0.8 Parallel implant placement considerations
- 0.9 Tapered implant placement considerations
- 0.10 3D implant position
- 0.11 Implant insertion torque
- 0.12 Intra-operative complications
- 0.13 Impression procedures, digital impressions, intraoral scanning
- 3.2 Treatment procedures esthetic zone surgical
- 3.3 Treatment procedures esthetic zone prosthetic
- 3.4 Treatment procedures posterior zone surgical
- 3.5 Treatment procedures posterior zone prosthetic
-
3.1
Treatment procedures general considerations
-
4
Aftercare
Templates for imaging and surgery
Key points
- In edentulous spaces, the diagnostic wax-up can be used to form radiographic and surgical implant placement guide templates.
- Radiographic and surgical guide templates assist in diagnosis and treatment planning and facilitate proper positioning of implants in bone.
Radiographic and surgical guide templates assist in diagnosis and treatment planning and facilitate proper positioning of implants in bone. In general, the diagnostic casts and wax-up are the basis to form radiographic or surgical templates.
Templates for imaging
A radiographic template is used for imaging and is still part of the diagnostic process. The diagnostic wax-up is copied and an acrylic resin matrix is made over the occlusal part of the remaining dentition, including the future position of the implant-supported restoration. Stable positioning of the template in the mouth of the patient is mandatory. A hole is placed into the acrylic resin in line with the desired position and angulation of the implant in relation with the future restoration. The hole is filled with a radiopaque material such as a metal bar or gutta-percha. With this radiographic template a radiograph can be made to get insight in the relation between the restoration-driven position and angulation of the implant and the availability of bone and vicinity of neighbouring teeth and other anatomical structures.
Templates for surgery
A surgical guide template is used during surgery as an aid for proper positioning of the implant in the bone. There are three design concepts based on the amount of surgical restriction offered by the surgical guide templates:
- non-limiting design: this design provides only an indication, without angulation, to the surgeon as to where the proposed prosthesis is in relation to the selected implant site;
- partially guided design: the first drill used for the osteotomy is directed using the surgical guide template, and the remainder of the osteotomy and implant placement is then finished freehand by the surgeon, still giving some flexibility;
- completely guided design: this design completely guides the osteotomy in all directions, including the depth of the preparation.
The non-limiting design is based on a cast and mostly a vacuum-formed template has been with an open space at the occlusal part of the future restoration.
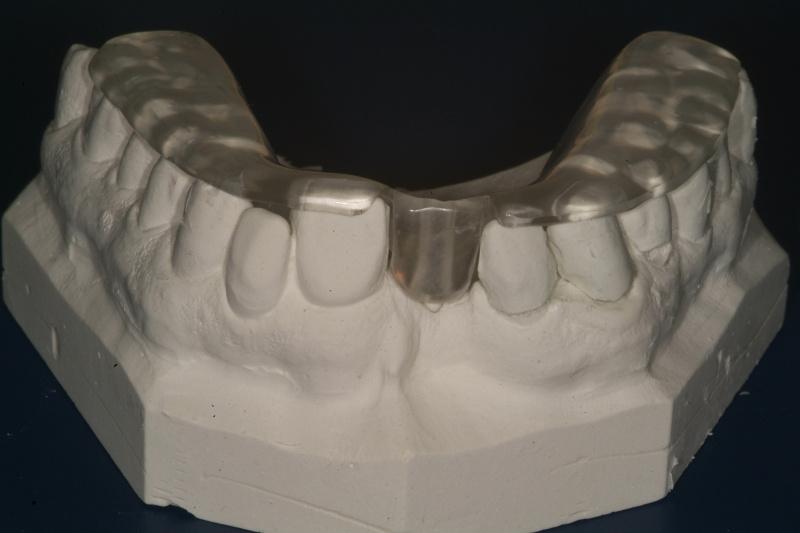
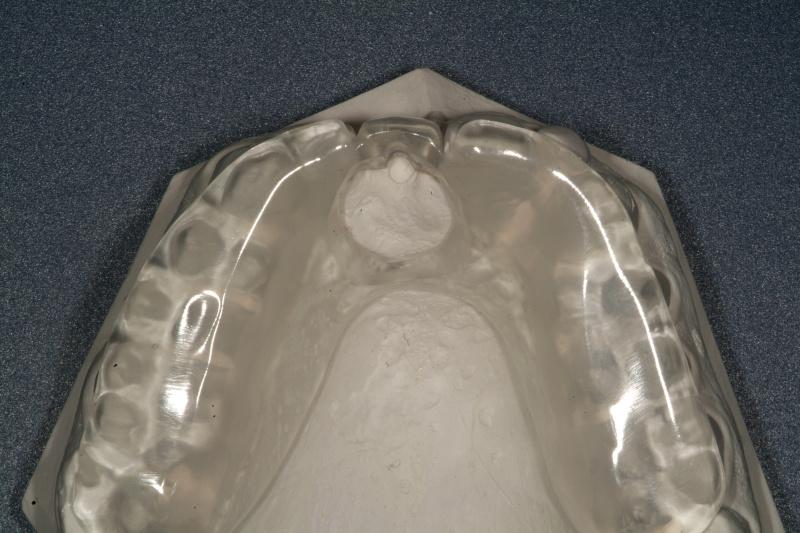
The partially guided design is based on a cast on which an acrylic resin matrix is made over the occlusal part of the remaining dentition, including the future position of the implant-supported restoration. A hole is driven into the acrylic resin in line with the desired position and angulation of the implant in relation with the future restoration. Acrylic resin is removed at the labial or palatal/lingual side, leaving an half-open tube for position and angulation of the first drill. Another design is with a metal sleeve in line with the desired position and angulation.
This completely guided design is based on cone beam computer tomography and planning software, instead of casts and a wax-up. The template is made with computer-assisted design and manufacturing (CAD/CAM) with titanium drill-guiding tubes, providing control of position, angulation and depth.

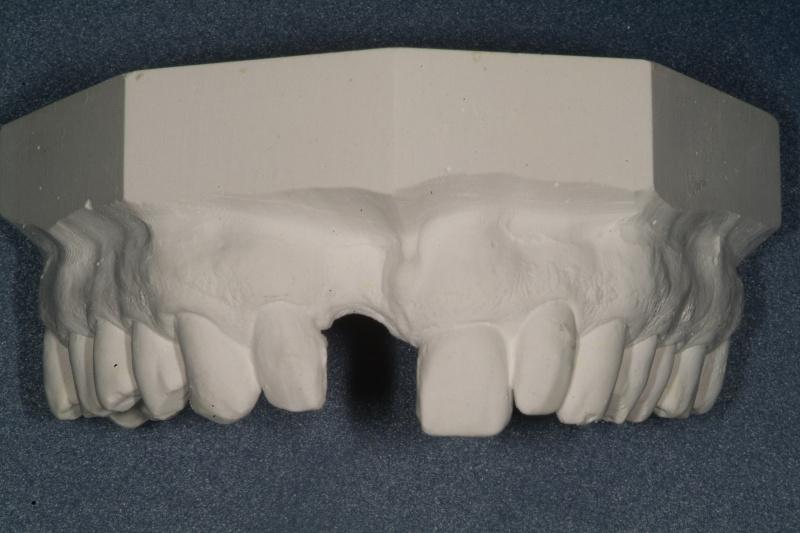
Figure 1: Diagnostic casts missing tooth in position 11 (#8 UNIV).

Figure 2: Diagnostic cast with surgical template, partially guided design, labial view

Figure 3: Diagnostic cast with surgical template, partially guided design, occlusal view.
